Pages

Thursday, June 14, 2012

A few tips on shooting weddings


I haven't been writing as much as I was busy with work and less amount of photography but a few weeks ago I had an assignment of photographing a wedding. So here are a few tips that I'd like to share my experience on it.
Tip no.1 : Be prepared. What I mean by this is that you wanted to start by scouting the location if possible to charging all your batteries.
 Tip no.2 : Get inspirations from others -> lookup other wedding photographers and see their work, observe carefully the pictures that you like and analyse them accordingly (like what focal length did they use, depth of field, lights and how they composed the shot). Of course you will encounter a different situation but the concept might somewhat be helpful.
Tip no. 3: Try to keep on talking to them (politely of course) and telling them what you want them to do (aka posing them).
Tip no. 4: It's got to be the light, how are you going to light them. During a wedding, you can't really bring too many lighting gears (booms, umbrellas and softboxes) and also you just don't have time to set them up. Tip no. 5: Bring in another photographer as it might save your life, :).

Here is the first shot that I would like to share :
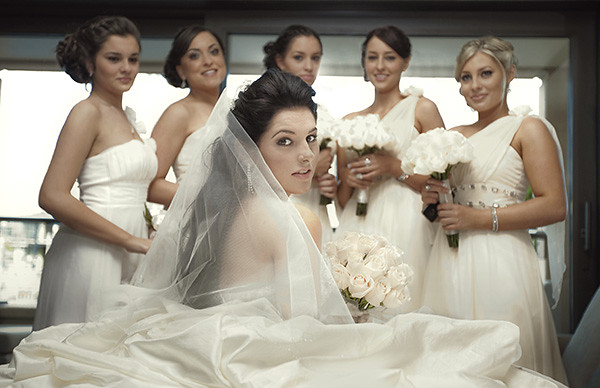
The bride wanted a shot of her and her bridesmaid, so that's what I did here. Arrange them (the bridesmaid) around her (the bride). As for the light, really nothing special here, it's just a simple ceiling bounce while holding the flash high (had a VAL to hold it up, :)). To pose the bride, I had asked her to sit on the bed facing sideways and hold her flowers. Lastly, I had the bride to turn and faced towards the camera. Even though this seems simple enough but you need to think the whole process through while they were still preparing here and there. I had tested my lights before I got everyone where they were (the last thing you want is for them to have you busy with yourself altering your camera settings or your lights).
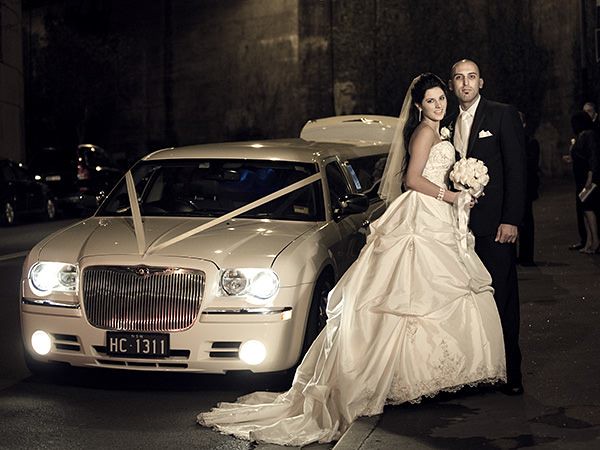
Now for this next shot, I had them (bride and groom) together and it was dark, I saw that the car was a lonnnggg limo (hemm pretty cool). So I thought to myself, hhehmmm let see where I can place them around this cool thing. Here the composition was somewhat ordinary (nothing fancy). As for the light, I realised that when I placed them besides the limo, their faces will be dark so I had the VAL to bounce the flash on the side-wall to create an even light on the pair. To create another dimension to the photograph, I had the headlights of the limo to be turned ON. Okay guys, I hope this short article would somewhat be helpful in a way.

Thursday, October 6, 2011

Shooting my good friend : Bernardus Ivan & his family

Well this was the time when I got the chance to see a friend after quite sometime. In the process, he wanted me to shoot him with his family which I thought, hehmmm what sort of picture would be good for a family portrait, how to light them, what poses should I get them to do, etc2. So in the end of the day, because I didn't bring all my gear, I had to improvise with what I had.
Father n SOn
In the first picture, he wanted me to shoot a picture of him and his son playing guitar together. I tried booming, then I realised I've come across and big problem of having a shadow behind him which I don't know how it got there until I saw the floor. It was pure white ceramic tiles which make a fine reflector. In the end, I decided to bounce of the ceiling as a fill and handhold my key light a little bit left of camera. I waited and waited and keep on snapping while talking to him and his son until I got this frame which shows the son was playing the guitar. Also because the son was a bit to short when photographed, I had asked for a pillow for him such that the balance of the picture is somewhat better.

Monday, October 3, 2011

Shooting my Mclaren diecast

So basically, I was inspired by my good photographer friend B.Ivan (a joint co-writer in this blog) in shooting die cast cars. This motivated me to shoot my diecast SLR Mercedez Mclaren car. In doing so, I had a few thoughts in my mind which were :
1. How should I shoot the car, meaning the angle etc2, -> composition wise.
2. How many lights would I need and how they are going to be placed.
3. What will be the focal length that I should use 
4. What aperture should be using

After wasting dozens and dozens of my camera's actuation, I found out that if your diecast model is small, it would be a good idea to shoot it using a wider focal length (as to make it look bigger). As for the composition, I've decided to shoot it from front on for my first shot and I have decided to use three lights. They were placed one on each side and the other one placed over head to give it a slick look to it. The lights were all being placed inside a DIY cardboard softbox and the overhead light was being handheld while the camera was put on timer. The result is picture is shown above. Regarding the aperture, I can't remember exactly but roughly around f8.


As for the second shot, I've decided to put the car model in an angle to give it a bit of dimension and depth to the image. Three lights were used in this instance, one was boomed down from camera right. Another was boomed just on the top left of the car and the last light was shot through a rattan basket with the intention of creating a pattern on the background. Also the background light was also gelled blue. All of the lights were placed inside a DIY cardboard box. The resulting image is shown above and its not too bad. I hope my experience here would somewhat be useful for you guys. Happy snapping everyone.

Thursday, September 29, 2011

Time Lapse photography

Time-lapse photography is a cinematography technique whereby the frequency at which film frames are captured (the frame rate) is much lower than that which will be used to play the sequence back. When replayed at normal speed, time appears to be moving faster and thus lapsing. (quoted from time lapse photography wikipedia). Basically it's fast forwarding time by taking lots and lots of frames at a fixed time interval and then playing it back at a movie frame rate so the viewer sees it as a fast forwarding effect. 
In order to do this what I realise is that you need lots and lots of dynamic movements or actions in your frame (otherwise it'll become dull and boring for your viewer). Also it takes a lot of patience and time to spare as you need at least an hour or two to just create a 10 seconds worth of clip so get what I mean, :).
Ok, lets stop the chit chat here and will show the links on how I learnt these technique. 
The first video shows you on how to capture the frames


The second video shows you how to put them together into a movie frame.
 and I will show my time-lapse photography taken at my university. The dynamic movements that I tried to capture here are :
1. The sun setting
2. The movement of people
3. The lights of the building 
4. The movements of the cloud
I have four dynamic elements here which if you could have more the better, that's what I think of it. Here is my result. Enjoy2.


Wednesday, February 23, 2011

Which Camera? Any will do

Sorry guys for all the longggg break without any post. In this post I will share a little bit of what goes inside my mind while taking my pictures. Has anyone ever heard of people asking "WHICH CAMERA IS BEST FOR TAKING PICTURES?", well the answer to that is not simple - basically for me it's the one that is with you when the right moment comes. Here are a few snaps that I took with my mobile phone with their thoughts while shooting them. Enjoy2.

An interesting image that I've managed to get  at Pitt st mall. He seems to be a very skillful guitarist. I only had my mobile phone with me and to get a picture of him I needed to be pretty close (no zoom in my mobile phone) so that's what I did, I went to him with my camera phone and while he was playing suddenly he realised that I was pretty close to him and he turned his head looked towards me (maybe thinking of WHAT IS THIS GUY TRYING TO DO!???) and that was when I snapped him, ;). Quite cool as I've managed to set my shutter speed in a way to get his hand blurry showing that he was strumming his guitar, :)) (this is completely rubbish as you can't set anything using camera phone), ;). The light was pretty good as well as it was somewhat cloudy that day. This image is postprocessed using photoshop express : cropped (to frame it), sharpened, contrast boost, desaturate and soft focus.

Monday, December 20, 2010

Shoot the Photographer : Kaveh Fanian


A little while ago (long time ago actually), I got to hang out with my best photography buddy Kaveh Fanian, a landscape and nature photographer. I've known Kaveh from his uni days (he has graduated and leaving me behind). Kaveh was doing his usual inspirational landscape shooting which does best. He decided to capture the beauty of Watson Bay which is one of the famous tourist places in Sydney.

Saturday, November 6, 2010

Point of Interest

strawberry_2_small
After shooting my BMW die cast toy car for the last couple of weeks (the post can be found here and here), I decided that I should start shooting something else. Again, flickr has become my source of inspiration. I started to browse through flickr to find what image should I take. Inspired by one of the picture I found, I decided to shoot something from my daily use.. Spoon and fork.
I always love the idea on how normal simple stuff like spoon and fork becomes very interesting photograph if you compose and lit it correctly. That's why I'm so excited to start this 'project'. I started by arranging my spoon and fork so that it would look nice. After a few try, I decided that I will cross the spoon and the fork together.
Still using my Nikon D40 camera and a Nikon SB-20 as my light source, I lit the spoon and fork using a bare flash. The result? Not good. Since spoon and fork are very reflective, I got a hot spot on one part of the spoon while the rest are dark. I need more diffused light. That's when I decide to make a light box.

Monday, November 1, 2010

Try to do a MacGyver, if you don't have something then try to create one!


My Home Made Lightbox
What if you don't have something that you need? Well then either you could buy it or you could make it yourself. A few months ago, I was about to list my lens to sell it on ebay and needed to get several snaps of it for the ads. I could simply go out and buy a $80 lightbox but then again I thought I would rather spend it on something else so it is the MIY (make it yourself) solution. One would ask why would you need a lightbox in the first place. Well as we all know that if we could make it as attractive as possible. then the item would sell at a higher price That is why you see people use decorations in shops and all sort of other elements to attract buyers. Well it's the same case here, by using a lightbox you are basically creating a nicer lighting and cleaner  background larger. The lightings are improved when the lightbox is used when compared to  using a bare bulb as the larger diffusion materials creates a larger lightsource which in turns softens the light (see strobist.blogspot.com to know more about lightings).  To put it simple, basically I am trying to imitate the how the PROS shoot their products for ads. To create the lightbox, I need to find a frame which can hold my diffusion materials, so basically searched and found an unused box which I could use as a frame to attach my diffusion materials, then I started cutting a few of the sides off. Then, I went to the kitchen to find baking paper to be used for diffusion materials. The baking paper were glued to the sides of the box. As I've got only two lights at that time, I covered one side using aluminium foil with the intention of it acting as a reflector.  Furthermore, I went and bought a $1.50 white cardboard to be used as my backdrop. My finished lightbox is shown above. I know it is not pretty, but then again it'll do the job, :).

Monday, October 25, 2010

It's All About See-ing the Light


_MG_0965 This was from an experience that I've got while shooting for people going on vacations to Sydney. Surely, this was one of my most interesting assignments that I ever had. So basically, I had to tag along to places where these guys were visiting and try to create some decent pictures for them. There were several places that they've visited but Darling Harbour was the memorable one, at least for me. It was late in the afternoon where the sun was going down and the place was in the shade.
This in turn created several problems for taking a photograph:
Firstly, the pictures will be flat (meaning lacking in contrast and colors as well).
Secondly, it is not easy to take good photographs especially when you are at a location (tourist places)  where you are surrounded by lots of people  buzzing around (thinking of how to pose them, camera setting, compositions, trying to remove distracting elements from your picture, worrying that your gear could get stolen, etc2).

Thursday, October 21, 2010

Playing with Toy Car (2)

BMW_side_refined_small_2
Last week, I post the steps on how I took the photograph of my BMW die-cast toy car model. The result satisfied me, at that moment. But after I browse through images of cars on Flickr, I started to realize that my picture was good but lack of the 'wow' factor. So, this week's post will be about my journey to find the one that give me that 'wow' factor(OK, I know. Not that 'wow'. But hey, I'm still learning.*self defense*)

After browse through the images on Flickr, I realized that the white background is the weakest link from my previous photo. So, I want to remove the background and change it with black. I still love the reflection, so I will keep it. I even tried new technique, I used a snoot to limit the light so it won't spill to the background. And the journey began.

Wednesday, October 20, 2010

Playing with Toy Car

Today I would like to share my experiences of taking a picture of my toy car. After being inspired by David Hobby's blog, I have decided to start to learn on how to light my photographs. (If you're a loyal reader of David Hobby's blog, then you will know that I'm inspired by him just by reading the title of this blog). After struggling to find a good bargain on speedlite for me to use and learn, finally I've managed to borrow an old Nikon SB-20 of which now I can play around with. Well, enough with chit-chat and it's time to do the story telling part. Yippie.

Monday, October 18, 2010

Don't go and snap Pictures Instead Create them


I'd like to share my experiences and thoughts that I have when taking a photograph. Alright let me start by discussing on what elements would make a good photograph? Well I think there are 3 important elements in creating a good photograph. The three elements are composition, lighting, and lastly capturing the moment (or setting the mood).